Tuesday, November 30, 2010

WEDNESDAY: My LATEST DECOR Project. THE COUNTRY FRENCH CHINA HUTCH

THE COUNTRY FRENCH CHINA HUTCH
I wanted to share with you my most recent project. I absolutely love French Country Decor , so when my mother decided to go with this motif in her Atlantan home, I couldn't resist. It's been a long process to do the whole house but it was fun. Here is a little sample of my work. Check it out.  Post your thoughts!! 

I decided to go with the traditionally southern "RED ROOM" for her main dining room.
So naturally i would do a BLACK china cabinet to add contrast.

Here is the FINISHED PIECE 


The BELOW picture  is what the hutch looked like before. I actually found this great piece of history listed on Craigslist.The owner graciously sold it me for a low price, even though it was a 94 year old heirloom antique. I was surprised to find out that this piece came from the governors mansion of Missouri dating all the way back to 1916. AMAZING Right???  When i saw the hutch  I FELL IN LOVE!.....I had big plans for this thing. This would be the main item to complete my mothers RED DINING ROOM. 


THE CABINET BEFORE

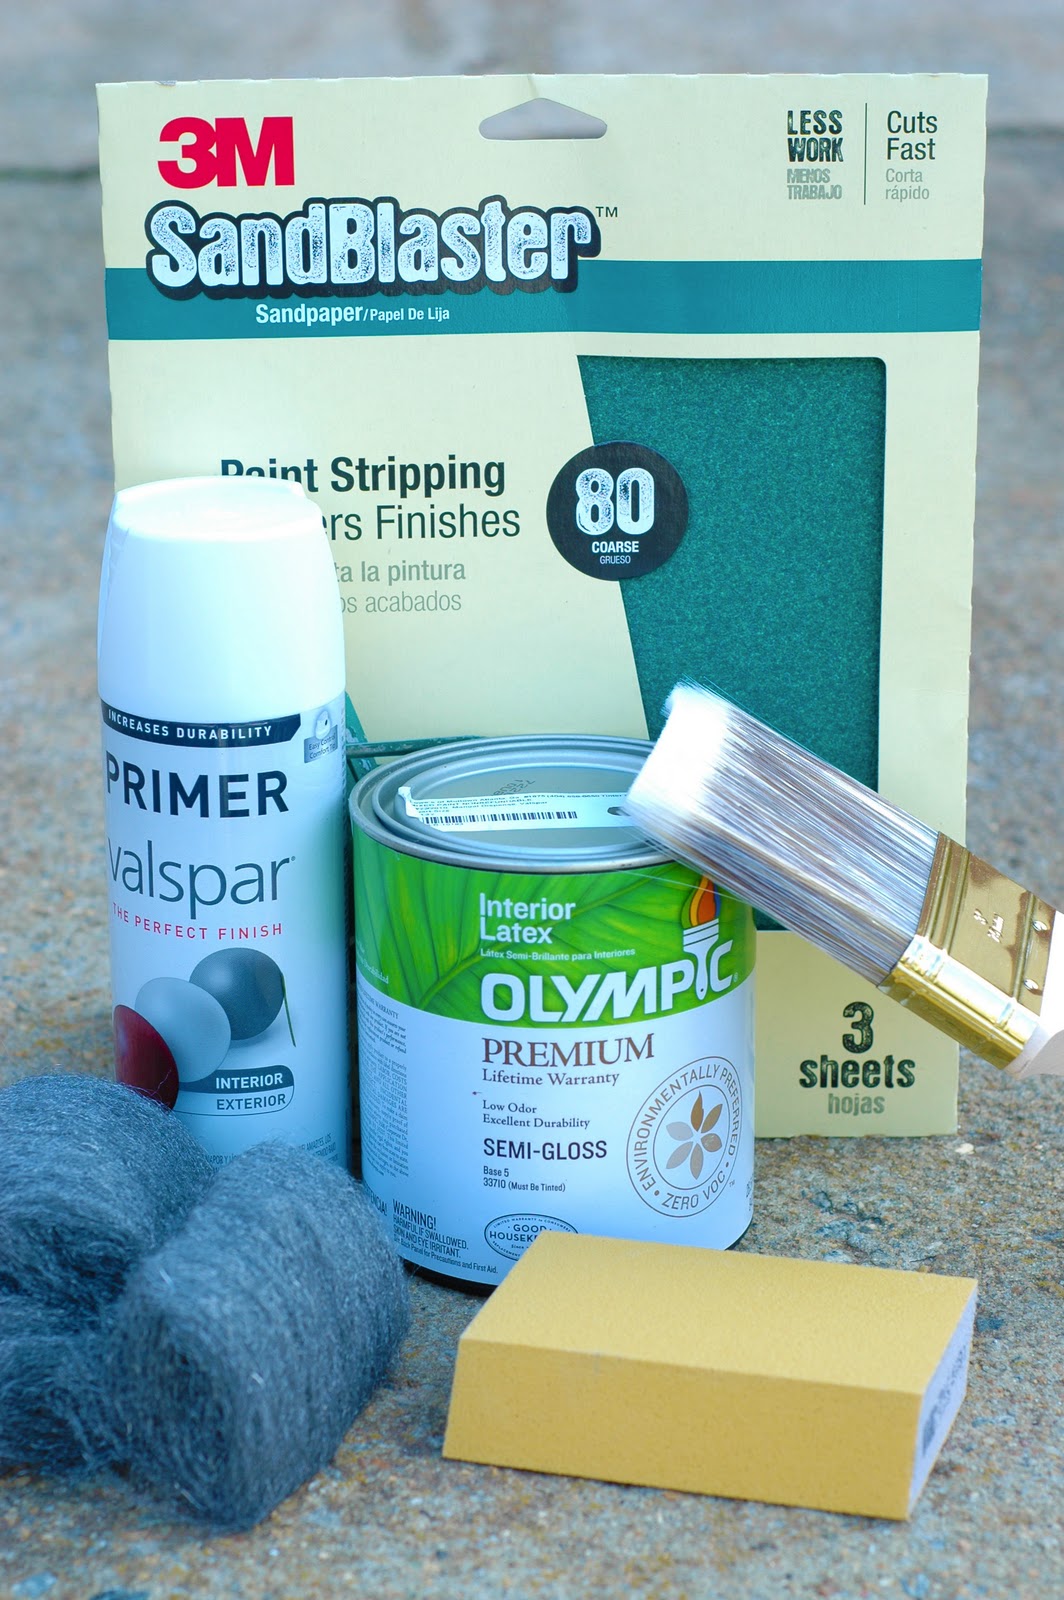
I wanted to give the hutch a different look by changing its color and by distressing it a little. So I went to my favorite HANDYMAN store........LOWES and got a few things to help me. 


Ruff Sandpaper, Steel wool,  A good paintbrush, MY selected color (Semi-gloss BLACK), and white flat spray paint.


First I sanded away the original finish and ruffed up the wood so that the new color would adhere
JUST A QUICK NOTE***** This will only work of furniture that is REAL WOOD
You cannot sand Veneered Wood or PRESS BOARD.......it WILL NOT work and will look like JUNK when you paint it.


Make sure you sand every inch.


 A little FLAT WHITE SPRAY PAINT to add an extra color
 that will show under the final coat of black paint. It also creates and extra texture on the wood.


ADD A COAT OF PAINT. LIGHTLY BRUSHED ON......


In this project it didnt matter if the paint was perfectly on.


Once the paint was on and distressed. I added a TOUCH of GOLD to the FACING 


FINISHED PRODUCT


DOESNT IT LOOK GORGEOUS!


I do hope you enjoyed my latest project.

DOES YOUR HOME NEED A FACELIFT?
If you would like to book a home consultation with Richard Tomas, you can contact 850.445.7818
or via email ricky9281@aol.com


SOME BOOKS OF INTEREST. CHECK THEM OUT!!!


Delectable Party Appetizers: Bacon Wrapped Chorizo Stuffed Dates!

Chorizo Stuffed Dates Wrapped in Bacon


With the Holidays fast approaching I decided to go ahead and host a small cocktail / dinner party at my home in the country here in Georgia. With quite a few influential people attending I wanted to create a smorgasbord of tasty appetizers and desserts.  So I went for the 3 S's- Sweet, Spicy, and Smokey. I also wanted something on a toothpick so that the consumers of the appetizer could easily eat while holding a drink all the while retaining clean fingers. After perusing Foodgawker I spotted Andrea's Chorizo Stuffed Dates Wrapped in Bacon- 3 ingredients that matched my criteria and all on a toothpick. 

This appetizer comes together very quickly once you prepare each ingredient. Slice the bacon in thirds, remove the casings from about 3 chorizo, and using a scissors, cut one side of each pitted date open so that you may stuff them. I am sure that any sausage will do, but be sure that it is spicy. Although my chorizo had an excellent flavor, it could have been a bit hotter. So know your brand of sausage first.


These were excellent little bites with big flavor. I was really surprised how sweet the dates came through once they were caramelized. I will be making this again and would love to try it with andouille sausage as well.


Chorizo Stuffed Dates Wrapped in Bacon
10 ounces pitted dates
1 pound bacon, sliced in thirds
about 6 ounces chorizo, raw, casings removed

Using a scissors, cut one side of each date open and stuff with a scant teaspoon of chorizo. Wrap the stuffed date with bacon and secure with a toothpick. Place on a foil-lined baking sheet and bake in 400 degree oven for about 15-18 minutes. Watch closely as the bottoms can burn easily due to the natural sugars in the dates. Makes about 45 pieces. Which i intend on serving with a spicy marinara sauce.
This should make a hit at my party. Try it out for yourself.

Sunday, November 28, 2010

MONDAY: Holiday Inspiration: Forget DECKING THE HALLS.....Dress up your DOORS!!

MY COLLECTION OF DOOR WREATHS!

Forget about Decking the Halls this year......DRESS up your Door. After all, it is the first thing people see! I put together a collection of beautiful, creative wreaths that will inspire!


Golden-Cedar Wreath

Whether you prefer rustic or radiant, this ideas will brighten any home.
Go for the gold and enrich a simple cedar wreath with tiny bells, sprigs of golden cedar, 
and a matching satin bow.


Oval Holly Wreath

Use holly leaves and berries to provide a brilliant splash of red and green against an  
 winter backdrop. While the sprigs look lovely in a garden, they spread even more cheer when crafted into a welcoming wreath for your door.


Fragrant Wreaths

Fill your home with the sweet smell of bay laurel (or rosemary) with this easy-to-make wreath. And when the holidays are over, don't throw it away: Be sure to wash the wreath well right after you make it so you can remove the dried herbs from the wire frame later for use in cooking.


Cushion Moss Wreath

An inviting wreath composed of cushion moss will thrive all year. Use some or all of the following natural materials to craft a beautiful wreath for your home.


Glass-Ball Wreath

This full-bodied everlasting wreath is crafted from bundles of gold, pink, and silver glass balls on wire stems.


Popcorn Wreath

Popcorn strands are classic tree decorations, but you can also use
 them to create a wintry wreath.


Present Wreath

Unwrap a new wreath idea this year. Cover small containers, such as old jewelry boxes, with weatherproof paper, which will hold up outdoors, unlike wrapping paper; seal with all-weather tape. Add decorative bands in contrasting colors, if desired, and tie with ribbon. Attach to a flat wooden wreath form (ours is 18 inches) using a hot-glue gun. Affix a satin bow.


Forest Floor Wreath

This substantial wreath, made with long Norway spruce pinecones attached to a bed of moss, can last for years if stored properly


Remember to have fun with decorating your door this season!


Here is a quick tutorial on how to make a natural WREATH for your DOOR


Saturday, November 20, 2010

Monday's Design INSPIRATION: An ELEGANT CHRISTMAS DINNER!

It seems like SANTA is RIGHT AROUND THE CORNER and we haven't even CARVED the turkey YET!!.........In my family its a tradition to put up the christmas trees in our home on Thanksgiving day, which is actually next week......I'M TOTALLY EXCITED!!!  I adore the months of November and December, because it brings my love of CHRISTMAS AND DINNER PARTIES TOGETHER.  All of the beautiful LIGHTING, ORNAMENTS, FINE CHINA and LINENS, not to mention the SOCIAL gatherings with INDULGENT foods and drinks. I'M getting FAT just thinking ABOUT IT!.....LOL....
I WISH!........I have always been a very nostalgic guy. This season brings about some of happiest memories of my childhood, and I am very thankful for that. I picked up this magazine they other day at the and it totally put me in the SPIRIT!......It featured beautiful DINNER SETTINGS that will TRULY stimulate your own HOLIDAY creativity.....CHECK IT OUT!

DOESN'T THIS COVER GET YOU IN THE MOOD FOR CHRISTMAS!!!


DECK THE HALLS WITH PLAID!!!


AN ELEGANT WINTER DINNING EXPERIENCE


 MINTY Sea Green is my favorite color!......


Rhinestone encrusted frames as name cards or ways to leave little holiday notes! Can we SAY DELIGHTFUL!!!


BOLD SPLASHES OF NON-TRADITIONAL COLORS CAN BRING
 YOUR HOLIDAY TO LIFE!


BE INSPIRED TO TRY SOMETHING NEW THIS YEAR FOR YOUR DINNER PARTY!


MARIAH CAREY SHOULD PUT YOU IN THE SPIRIT!!


Friday, November 19, 2010

FRIDAY'S My CHIC Condo in FLORIDA


MY FORMER CONDO - 
CHOCOLATE DELIGHT!   

So now that I'm back in Atlanta I am searching for that place to lay my head. For those of you who know me personally know that wherever that place is.....Its gottta BE FABULOUS! When I lived in my condo in Florida I went with a warming color scheme......Burnt Oranges, Chocolate Brown Silk, Golds, Sea Green, and copper.  Needless to say it was SEXI~~~ CHECK IT OUT......


ME GOING THROUGH MY JUSTIN TIMBERLAKE PHASE......NO HAIR.......
MY DINING ROOM. Dont you wanna come over for DINNER?

CHOCOLATE BROWN SILK TAFFETA DRAPERIES


MY BOUDOIR!.......It looks totally different now!!......


I AM REDECORATING THE WHOLE PLACE NOW HERE IN ATANTA!......
HOLLER AT ME IF YOU WANT ANY OF MY PIECES......STAY TUNED FOR PICTURES FROM MY NEW LOFT IN THE CITY!!

ENJOY THE WEEKEND~


Thursday, November 18, 2010

THURSDAY' REDESIGN - Bedroom TRANSFORMATION From Shabby to CHIC!!


FROM SHABBY to CHIC on a BUDGET!!

Okay! So I was looking through some of my design photos from several projects that accomplished years ago and I came across a set of these pics from a bedroom that i did for one of my dear friends during my brief stint in Chicago. Yes I also do interior decorating......and i LOVE IT!!!!  Normally I tend to over do it a little when i decorate a room. I want that ROOM TO MAKE A STATEMENT!  Bringing in Gorgeous Art, Drop Chandeliers, Silk Taffeta Draperies, Buttttttttt.... with this particular client UNDERSTATING and SIMPLIFYING everything was KEY! 

Here are some GREAT PICS of the FINISHED project.
MB 2010 (149)

MB 2010 (154)


MB 2010 (171)

MB 2010 (27)

Some interesting wall angles and the need for tonnes of storage really dictated my design for this master bedroom. Function and HER budget were high priorities so I decided to work 'pretty' around 'practical'. The neutral palette combines loads of natural texture with vintage elements for a relaxed yet fresh feel. While there are still a few additions I'm considering (bench seat, gilt mirror, another piece of art or two - oh, and my task lamps!) I'm pretty happy with how it came together. 

So, here’s the floor plan just to give you an idea of the room’s weird shape (BED 1):
Floor Plan

And here's the space before (cringe!):

2009 Bedroom (9)

2009 Bedroom (12)

Robe Before (6)

2009 Bedroom (10)

Well, that was after we already simplified the canvas by painting out the green walls and brown trim (Dulux Chalk USA on the walls, Dulux White Watsonia on the trim), replacing the dirty old carpet and removing the HIDEOUS!!! ultramarine blue curtains!

If you've been following this makeover from the beginning, aside from being incredibly patient :-), you should also recognise a fair bit of the decor.
(If you missed any or all of the lead-up posts you can catch them here where you can read about, amongst other things, how I created the massive mapmade my linen throw and cushionscame up with an attractive blackout window treatment solution and used gift wrap for wall art).

Pretty much all of the decor has been thrifted, bought on clearance or hand-made and every piece of furniture in the room is second-hand. Here it all is pre-makeup:

Bedroom Befores Collage

(To avoid a massively lengthy post I'll cover each refurb in more detail in separate posts shortly).

Now, if like me you love a good before and after you’ve come to the right place!

Before
Wardrobe Before

After
MB 2010 (115)

Before
Shoe Cabinet Before

After (aging furniture really is not that hard)
MB 2010 (49)

Before
Commode Cupboard Before

After
MB 2010 (141)

Before (Found this at a flea market)
Chest of Drawers Before

After (Sanding, New Stain, New Hardware = New Piece)
MB 2010 (144)

Before (Get Rid of the God-Aweful Art)
Massive Picture Before

After ( I love to use vintage maps as Art)
MB 2010 (173)

Before
2009 Bedroom (12) - Copy

After
MB 2010 (171)

And just cause I can’t help myself here are a few little detail shots too:

MB 2010 (29) MB 2010 (41)

    MB 2010 (140)     MB 2010 (87)

If you’re interested in some further info about this room makeover, including the item origins and cost breakdown, keep an eye out for some separate future posts. Or you can book a consultation with (me) Richard Tomas by logging onto www.richardtomas.com

I hope you felt truly inspired to RECREATE YOUR OWN CHIC PLACE!!!
Have a great week everyone!


Check out some of my Favorite Magazines!! SUSCRIBE TODAY!!!


Related Posts Plugin for WordPress, Blogger...
FREE Shipping over $49 on ALL Orders!banner banner